In many summer cottages you can easily find currants and gooseberries, but by growing yoshty not all gardeners are involved. This hybrid has not yet received universal acceptance, although those who have encountered it have already managed to appreciate the full benefits of such berries. Yoshta not only helps to restore hemoglobin in the complex treatment of anemia, but also normalizes the gastrointestinal tract, and also contributes to the speedy recovery from colds, hypertension and problems with blood vessels (strengthens their walls). That is why it is so important to know how to plant, care for (and, in particular, trim) yoshtay from spring to the very cold.
History of breeding yoshta
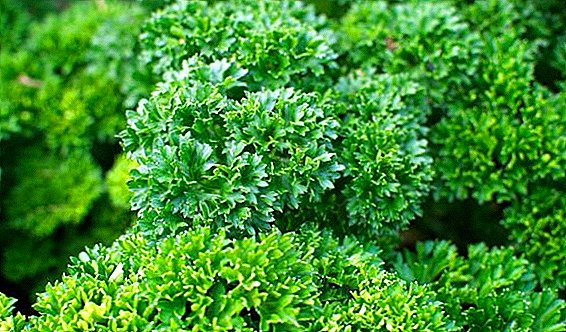
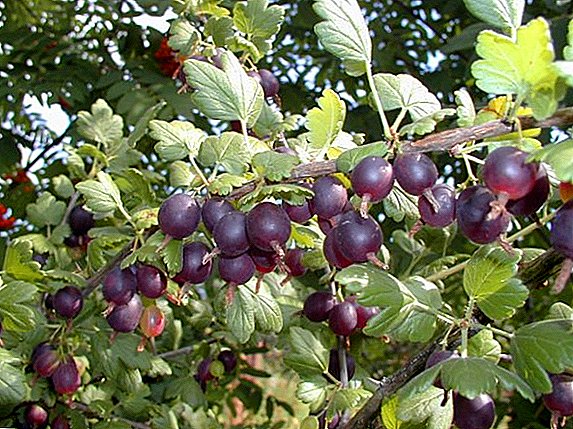
 In appearance, yoshta resembles a large currant or black gooseberry, which makes it look like both species. In fact, experiments on the crossing of these plants lasted for more than a century without any serious results: the bushes bloomed, but they did not give fruit. It was possible to achieve a positive result only in the 70s of the twentieth century, when the German breeder R. Bower derived the first fruiting hybrid.
His "name" consists of two letters of the German name for currants and three letters for the name of the gooseberry, which as a result of the merger gave the word Josta (yoshta). At about the same time, another German breeder, H. Murawski, thanks to numerous experiments, developed three more currant-gooseberry hybrids, which ultimately received the names of Jokhne, Moro and Jochemin. In the future, all displayed hybrids were obtained thanks to the efforts of breeders from other countries, in particular, and Russian scientists. All new specimens differed in the size of the bush or the berries themselves, the shape of the leaves, the yield and taste.
Currently, a popular hybrid of currants and gooseberries is a powerful bush with studless shoots reaching a length of 1.5 meters. In comparison with the black currant, the yoshta branches are more durable. This plant forms a small number of root shoots, so it does not need a strong pruning. However, the main advantage of the yoshta, which favorably distinguishes it from the same currant and gooseberry, is its high resistance to the main diseases of the “parents” and good frost resistance.
Did you know? Vitamin C content in yoshte is slightly lower than in currants, but 2-4 times more than in gooseberry.
How to choose the yoshta seedlings when buying
If you decide to plant a yoshta on your own plot, then the first thing you need to know is the criteria for choosing the seedlings of this plant.
Here it is necessary to take into account a number of the following features:
- The younger the purchased seedling, the easier it will take root in a new place.
- The root system of plants should be powerful and healthy, and the roots themselves - fresh and moist. With dry and weather-beaten roots, the sapling will take root, but will grow very slowly.
- In a high-quality seedling, the bark on the shoots and the trunk will be smooth and elastic, and if it has already managed to wrinkle, it means that a specific specimen was dug out long ago and has already managed to dry out.
Important! If you pinch off a small part of the bark, you can find out if the living sapling has already dried up. Green bottom indicates the suitability of the chosen option, while brown will indicate his death.
When buying a seedling in the autumn, the leaves that are on the branches must be carefully removed without damaging the buds in the axils. In addition, before transporting the purchase, the yoshta roots should be wrapped in a damp cloth and placed in a plastic bag.
Site selection and soil preparation for yoshtu
 Yoshta's planting (both in spring and in autumn) can be carried out with a different purpose: for obtaining a high-quality harvest or for decorating a summer cottage. In the latter case, the quality and abundance of the crop plays an insignificant role, therefore, bushes can be planted both in the sun and in the shade, choosing elevated or low-lying areas of flat surface or territory on a slope. In the case when the primary task of growing yoshta is to obtain a large number of juicy and tasty berries, it is better to look at the sunny and fertile tracts of land. Preparation of the selected site is necessary only in the case when weeds are growing on it, and the land is not originally characterized by high fertility. In such a situation, soil is dug up and rotten organic fertilizer is applied at the rate of 15 kg per 1 m².
Proper planting Yoshta seedlings
As soon as you buy a yoshta sapling and prepare a place for it, it will be possible to proceed to direct planting of the plant in the ground. However, before this, it is necessary once again to inspect the acquired seedlings, to remove dried branches and dead roots.
As we have already noted, the yoshtu is planted in a permanent place of growth in spring or autumn. To do this, first dig a hole with a depth of 50-60 cm and a width of 50 cm (more is possible, depending on the size of the seedling root system). Compost or humus (half a bucket), 100 g of superphosphate and half a liter of wood ash are added as a fertilizer. All these fertilizers are thoroughly mixed with a fertile layer of soil, which is subsequently filled into a hole 1/3 of its volume. The next must be a fertile layer of soil without fertilizers, which is poured over with a bucket of water. As soon as the liquid is completely absorbed, a sapling is placed in the middle of the pit, its roots are straightened, and the pit is covered with earth, slightly tamping up the ground. Finally, the soil is once again watered and mulched with peat, grass or hay (optional). The height of the mulch layer should be about 10 cm.
Important! For the best growth of seedlings immediately after planting they are pruned, leaving two to three buds on each shoot.
Most often planting occurs in the spring, but in some cases planting yoshta is more relevant in the fall. There is nothing terrible in it, and the whole process follows the above scheme, with the only difference that the pits for seedlings are prepared two weeks before planting.
Care for your garden
 Those summer residents who choose yoshtu for planting on their own plot are probably already aware that it is much easier to care for it than for gooseberries, and it is not much more difficult to care for currants. The main activities carried out are reduced to loosening the soil near the bushes, weeding weeding, regular watering and fertilizing of the soil and mandatory protection of the shrub from pests and diseases. That is, in fact, the whole care for yoshta.
Soil mulching
Soil mulching creates an optimally stable balance of moisture and nutrition in the soil, which saves you from the need to constantly loosen the soil under a bush. The role of mulch is well suited to rotten compost or humus, which requires 1-2 buckets per bush. Also a good option is considered the use of peat. Moreover, mulching the soil under the crown of the shrub and in the area of its trunk will not only create a favorable nutrient regime in the soil, but also limit the evaporation of moisture, and also prevent the growth of weeds.
Did you know? Yoshta can grow in one place for up to 20 years, all the while delighting you with a bountiful harvest.
Watering yoshty
 One of the main requirements for growing yoshta is abundant and regular watering of the shrub. The lack of moisture in the soil leads to delays in the growth and development of the plant, which is why it is very important to maintain the soil moisture around the bushes, especially during the growing season. The liquid introduced should moisten the earth to a depth of the root-forming layer, which is 30-40 cm. Approximate water consumption in this case will be 20-30 l per 1 m² (meaning one irrigation), and the frequency of irrigation depends largely on the moisture permeability of the soil, weather conditions and the presence / absence of a protective mulch layer on the surface.
In addition, an important aspect in this matter is the time of making the liquid. So, it is best to water the yoshta in the early morning or immediately after sunset, pouring water into the previously made circular grooves, the depth of which should be 10-15 cm (usually they are located at a distance of 30-40 cm from the crown projection). From the outer side of the grooves they fill up the bounding earthen rollers, 15 cm high. If the plants are watered under the scorching sun, all the moisture will quickly evaporate.
Yoshta fertilizer
As practice shows, yoshta, grown only as a decorative element of landscape design, does not need additional feeding, but if you want to get a rich and tasty harvest, then this issue will have to be given due attention. By and large, the plant responds well to fertilization and in the first few years you will need 4-5 kilograms of organic compounds per year. In addition, yoshta needs other nutrients: potassium sulphate (20 g per year per 1 m²) and superphosphate (30-40 g per 1 m²). Organic fertilizers (diluted fresh mullein can be used) and superphosphate are applied to the soil in early summer, and potassium sulfate is added to the soil in the autumn.
Did you know? Mineral fertilizers can be easily replaced by bird droppings or the same mullein at a ratio of 1:10 (applied to the soil in early summer) and a half-liter jar of wood ash in the autumn.
Yoshta processing
 Like many other plants, yoshta is susceptible to the attack of harmful insects, although this is not such a serious problem as when growing currants. Yoshta pests are mainly represented by various types of mites and aphids, as well as moth butterflies and currant glass cases. The most effective means in the fight against these insects are insecticides "Akarin", "Agravertin", "Biotlin", "Detsis" and "Kleschevit". However, in order to protect your plant from the invasion of pests and various diseases, the treatment with the above preparations should be carried out not only for the treatment of yoshta, but also for their prevention. For this purpose, in the spring (before buds begin to bloom on the shrub) and in the fall (after the plant goes to rest), the yoshta is treated with a one-percent solution of Bordeaux liquid, copper sulphate or seven-percent urea solution. Urea is the preferred option for this treatment, since in addition to protection against pests and insects, it also performs the function of feeding plants with nitrogen fertilizers. In any case, it will be possible to start spraying only when the temperature in the garden reaches +5 ºC.
All the nuances of pruning Yoshta
Although yoshta does not need formative pruning, you still have to face this aspect of plant care. Thus, with the onset of spring, sanitary shrub of the shrub is carried out, which involves the removal of broken and diseased shoots, as well as shortening healthy parts that have frozen slightly over the winter. In addition, after 7-8 years, it is necessary to shorten the shoots, leaving only segments with 6-8 buds on the bush.  Sanitary measures are reduced and pruning yoshty autumn. As soon as the bushes and trees pass into the dormant period, the gardeners cut out the broken shoots, as well as the parts affected by the glass case. Moreover, healthy branches, which are cut to one third of their length, are subject to shortening.
How to propagate yoshtu
Like currants, yoshta has several options for vegetative propagation, which means that every gardener can choose the most suitable option for himself. What it will be (grafting, dividing a bush or planting a plant by layering) - only you decide, but in any case it is necessary to take into account the peculiarities of each method.
Dividing bush
This breeding option is used in the autumn and only when a bush needs to be transplanted. In this case, reproduction and plant transplantation provide for the following actions: having dug up a bush, its roots are cleaned of adhering soil and divided into parts with a sharp knife or pruner. Each of them should have developed roots and several strong shoots. For sanitary purposes, the cutting sites are treated with crushed coal, after which the obtained parts are seated at previously prepared places. Territory selection and soil preparation for planting are performed according to the previously described rules.
Cuttings
 Yoshta grafting in spring has two options for implementation: using green cuttings or by means of semi-woody plant parts. In the latter case, matured shoots of two to four years of age are chosen for material procurement. It is better to do this in the autumn time (in the second half of September), since in this case, the cuttings planted for rooting will have time to settle down and overwinter normally, and in the spring they will all grow together. Taken from the maternal shrub part of the shoot should have 5-6 buds and reach 20 cm in length.
Important! An unripe shoot tip is not suitable for rooting when using semi-woody cuttings.
The obtained parts of the yoshta are planted in excavated soil at an angle of 45 º, keeping to a distance of 60-70 cm. Only two buds should remain above the ground. As with conventional planting, the land around the seedling is slightly compacted, watered and mulched with peat. As for green grafting, in this case, on the contrary, apical cuttings, which are 10–15 cm long, are better suited.. All lower leaves are removed from them, and the upper ones are shortened by a third of the length.  Such cuttings can be planted in open ground throughout the summer (from June to early September), but a cold greenhouse is also useful. Light cuts are made above each kidney of the cuttings, after which the lower sections are placed in the root-forming solution and left in it for 12 hours. After this time, the cuttings are taken out, washed with clean water and planted in a constructed greenhouse close to each other with a slope of 45 º. Now it remains only to pour the seedlings through a fine sieve and cover with a transparent lid. Between the edge of the cover and the cuttings themselves, a space of at least 15-20 cm should be preserved.
The first time after landing the cover can not be lifted. Fresh air and a temperature of +20 ºC should be kept in the greenhouse, but as soon as this value reaches +25 ºC, the lid is lifted for ventilation. If all the recommendations are followed, the cuttings of the yoshta will take root within 3-4 weeks, and it will be possible to proceed to tempering procedures by daily removing the cover from the greenhouse and increasing the duration of ventilation. As soon as the cuttings are well strengthened - the cover is completely removed. It should be noted that the survival rate of green cuttings is somewhat higher than that of semi-lignified parts of the shoot, therefore, the use of this method of reproduction is preferable.
Layering
 Yoshta reproduction by layering is carried out in early spring, as soon as the soil warms a little. To realize this plan, you need to select well-developed annual or biennial shoots, place them in the grooves about 10 cm deep prepared in advance in the loosened soil and fasten with metal hooks. The tops that remain above the ground are pinned and sprinkled with fertile soil. As soon as the cuttings appear shoots with a height of 10-12 cm, they should be sprinkled with earth to half. After two or three weeks, the earthing up is repeated at the same height, and in the fall (or even better next spring), the rooted cuttings are separated and planted in a permanent place. In addition to horizontal otvodkov, with the reproduction of the yoshta can also use the arc or vertical versions of this method.
Yoshta Harvesting
Full ripening of yoshta berries occurs within 2-3 weeks, and the weight of each of them varies from 3 to 7 grams. Given the fact that the berries collected in the brush ripen at different times, it is likely that their long stay on the bush.  However, be that as it may, harvesting is carried out from the middle to the end of July, since it is at this time that the yoshta reaches biological maturity. The fruits of the shrub are used both fresh and after processing into jam, fruit drinks, compotes, jam, jelly, jam, etc. Depending on the climatic conditions and the level of ripening, the yoshta berries can be sour-sweet, sweet or very sour. Having decided to plant a yoshta on your plot, you will firstly make sure that this is a truly unique plant that combines all the positive qualities of currants and gooseberries.