When keeping a large farm or simply during mass breeding of poultry, it is undesirable to trust the brood chickens to nestlings, since the percentage of hatchability is not high in this case.
To solve this problem a special automatic device can help, in which the entire period of incubation will maintain optimal conditions for the development of chicks.
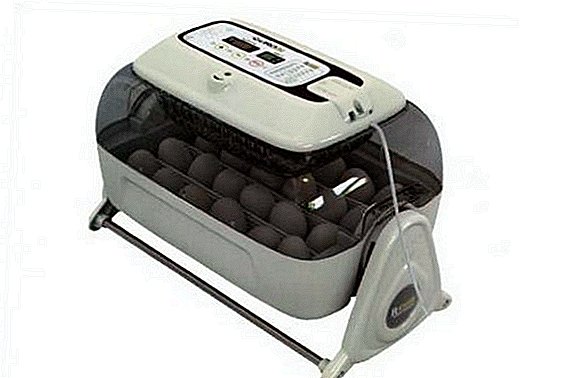
In addition, almost all species make it possible to get at least 20 chicks for one laying of eggs. In this article, we will pay attention to the domestic incubator R-Com King Suro20, which has already managed to establish itself on the positive side and is often used by domestic poultry farmers.
Description
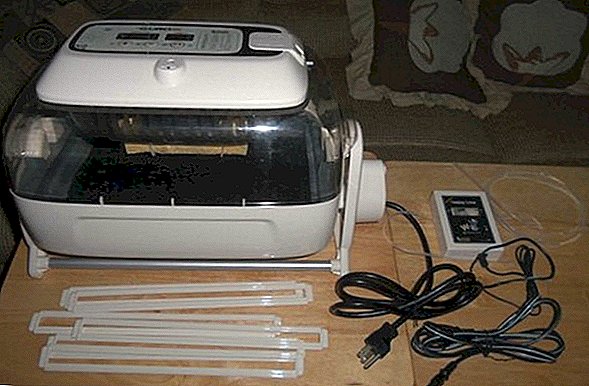
King Suro20 - Korean assembly incubator designed for breeding chickens, ducks, geese, parrots, quails and pheasants. Under all conditions of use, the percentage of its productivity can be 100%.
Did you know? The first primitive incubators were used more than 3,000 years ago. To heat the eggs, the Egyptians burned straw and controlled the temperature "by eye". In the USSR, mass production of devices began in 1928, and every year domestic farmers received new, improved models.
This device differs from the others in the original design of the case and the high quality of its manufacture: the incubator is designed taking into account all the required proportions and maintaining the center of gravity, so you can not worry about the number of eggs placed inside (the device will in any case retain its stability).  The main thing is not to leave King Suro20 in direct sunlight, in places with high levels of humidity or in a draft.
Check out the technical specifications of household incubators such as "Egger 264", "Kvochka", "Nest 200", "Sovatutto 24", "Ryabushka 70", "Ryabushka 130", "TGB 280", "Universal 45", "Stimulus -4000 "," IFH 500 "," IFH 1000 "," Stimulus IP-16 "," Remil 550TsD "," Covatutto 108 "," Layer "," Titan "," Stimulus-1000 "," Blitz "," Cinderella, Janoel 24, Neptune and AI-48.
As for the additional features of this incubator, they should include a large window to monitor the incubation process, an automatic egg rotation system, complete autonomy in maintaining the temperature and humidity inside the device, and a strong body that makes this option even more suitable for home use. of use.
Consider all of its features and functionality in more detail. 
Specifications
To get an overview of the R-Com King Suro20 incubator, you should familiarize yourself with its technical specifications. allocated on the basis of certain criteria:
- device type - automatic household incubator;
- Overall dimensions (HxWxD) -26.2x43.2x23.1 cm;
- weight - about 4 kg;
- production material - shock-resistant plastic;
- food - from a network of 220 V;
- power consumption - 25-45 W;
- temperature inside the incubator, maintaining humidity and turning eggs - in automatic mode;
- type of rotation - console;
- temperature sensor accuracy - 0.1 ° C;
- manufacturing country - South Korea.
Video: Review of the incubator R-Com King Suro20 Many suppliers give 1 or 2 years warranty for this model, however, judging by user feedback, there should be no complaints about its work even after a longer period of time.
Production characteristics
In addition to the basic technical characteristics of the incubator, its productivity indicators in terms of breeding of different bird species will be no less informative.
Did you know? According to one of the versions, the model of the specified incubator got its name in honor of King Suro, who ruled Kymgvan Kai in the ancient Korean state from 42 AD.
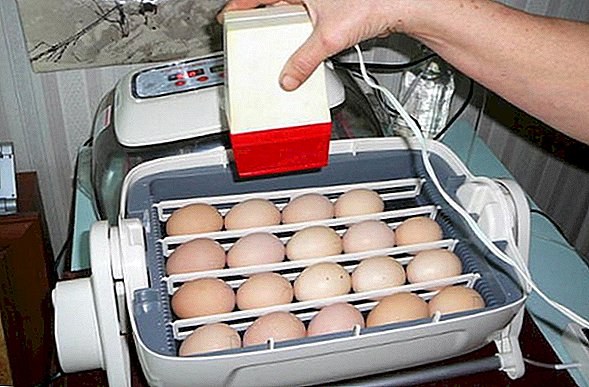
Despite the fact that the device has only one tray for laying eggs, it is universal and it is equally good to place both chicken and duck eggs, goose and quail eggs, as well as eggs of some other types of poultry. 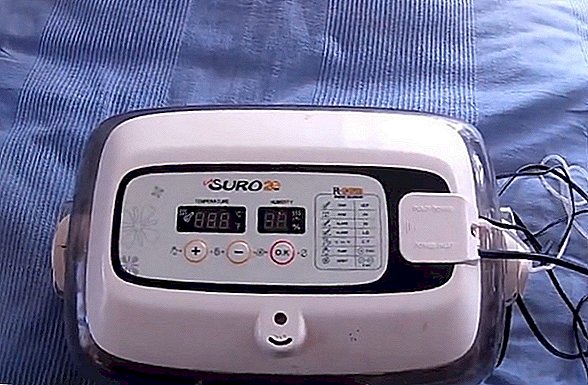 The difference will be only in their number:
- average eggs of chickens - 24 pieces;
- quail - 60 pieces;
- duck - 20 pieces;
- goose - an average of 9-12 pieces (depending on the size of the eggs);
- pheasants eggs - 40 pieces;
- parrot eggs - 46 pieces.
Important! For the convenience of placing eggs on a pallet, special incubators are included in the delivery package of the incubator. They are made of soft, very flexible material, which allows placing eggs of different sizes inside.
Incubator Functionality
R-Com King Suro20 is a unique model of incubators, because, in addition to positive external data, this device also has a whole set of indispensable functions that make the process of incubating eggs extremely simple and understandable even to a beginner breeder.  The main functional characteristics include:
- the ability to automatically install and maintain temperature and humidity in accordance with external conditions (the artificial intelligence of the dashboard and the Swedish sensor of increased accuracy are responsible for this);
- automatic egg reversal system;
- humidification unit with pump automatic;
- automatic moistening in just a few minutes by pressing the "+" button for 10 seconds;
- the possibility of using the adjusting lever for dosing the incoming air;
- availability of RCOM technology, which ensures an even distribution of air flow without direct blowing of eggs;
- the choice of temperature units between Kelvin and Celsius;
- the presence of a temperature alarms detector when they deviate from the specified values;
- safety of all settings in the memory of the incubator and information about power failure.

All the functionality of the device became possible due to the peculiarities of its design. Thus, a dense body assembly eliminates the likelihood of condensate accumulation, rotating heater holders facilitate control, and the presence of water nipples allows you to add water with maximum precision.
You will probably be interested to read about how to choose the right household incubator.
For intake of fresh air inside the incubator and minimal heat loss, 4 air holes correspond, and it is possible to reduce the load on the automatic pump, thereby prolonging its service life, thanks to special rollers (there are also 4 of them).
At the bottom of the egg tray has a corrugated coating, so that the legs of the hatched chicks will not slide on the surface, and the chicks are not injured. 
Advantages and disadvantages
Some advantages of the described model are given above, but these are not all the advantages of the King Suro20 - the list of advantages can be expanded, including the following:
- quick assembly and disassembly of the case (this feature is especially valuable when cleaning and disinfecting the incubator);
- removable electrical unit, which, if necessary, is very easy to clean;
- the presence of all three buttons on the lid, which greatly simplifies the control device;
- good tightness of the structure, which allows to preserve all the specified indicators of the microclimate;
- use in the creation of only environmentally cleaned plastic materials, which, in combination, also possess antibacterial properties.
Nevertheless, speaking of the merits of the model, it is impossible not to mention the shortcomings of the King Suro20. 
Most often they include such nuances:
- the tube filled with water may touch the heating element under the lid and melt, so each time you close the device you will have to watch it closely;
- Due to the slow operation of the pump, the incubator also slowly gathers the necessary humidity indicators, so before you connect the tube, you can pre-fill it with water;
- Sometimes there may be problems with the rotation system during the incubation of goose eggs, as they weigh much more chicken (in such cases you have to manually correct them);
- Only distilled water is suitable for the correct and stable operation of the incubator, the absence of power outages is also important - turning off the power leads to rapid heat losses of the device, which affects the development of chicks.
Instructions on the use of equipment
You should not try to connect the device if you do not understand all the intricacies of its operation.  At the slightest violation of the requirements for assembly or connection, its incorrect operation is possible, which can lead to breakage or damage to the laid eggs.
Preparing the incubator for work
Before proceeding to the collection of the device, determine the specific location of its placement. In the selected room, the temperature should be kept at + 20 ... +25 ° С, and the level of noise and vibration should reach the maximum possible lower limits.
We recommend reading about how to disinfect the incubator before laying eggs, how to disinfect and wash eggs before incubation, how to lay eggs in the incubator.
Illumination can be average or slightly above average, but the main thing is that the direct rays of the sun should not fall on the device. As for working directly with the incubator, All preparatory measures and adjustment are reduced to a number of interrelated stages:
- To begin with, open the box with the incubator and check the presence of all the elements that should be included in the kit (you do not need to throw out the box: it is suitable for further storage of the device).
- When you take out the incubator, loosen the two screws that connect the control unit to the viewing window, and, turning back 4 more grips, detach it.
- Well fix the silicone tube in the hole intended for it and make sure that it is not pinched.
- The nipple from the tube from the viewing window must be inserted into the hole in the control unit, and then connect the unit with the viewing window and secure them with two screws (but do not tighten them too much).
- Now cut a suitable evaporative gasket (evaporation level will depend on its size: 50-55 mm - 50%, 70-75 mm - 60%) and fix it on the viewing window using two studs.
Important! Evaporative gaskets (sold separately) should be replaced at least once every six months, but more specific periods depend on the quality of the water used (as mentioned above, it is desirable that it be distilled).
- Connect the device case, the pallet and a lining to it. Now it only remains to place the eggs.


Egg laying
The process of laying eggs can be called the easiest task when working with the King Suro20 incubator, because all that is required of you is to arrange them and divide the space with the special partitions included in the kit. However, there are some nuances.
We advise you to read about how to properly incubate chicken, duck, turkey, goose, quail, indoutin eggs.
For example, eggs should be placed only with a sharp end down, and so as not to put too much pressure on the neighbors (near the larger egg it is better to place a smaller one so that they do not touch during the incubation process).
As soon as all the testicles take their places, you can close the lid (overview window) and begin to collect the console and the pump.
Video: laying eggs in an incubator To do this, follow these steps:
- Insert aluminum tubes into the frame so that they fit snugly against it.
- Place the console on a flat surface and firmly tighten the mounting screws. The second side is going like the first. The console should perform a slow turn of the eggs, about 90 degrees every hour, but even if you think that it does not always adhere to this interval, applying the WD-40 spray to the transfer mechanism and the working part will help soften the work.
- Now, to collect the pump, cut the 35 mm silicone tube and insert the nipple into it, as shown in Figure 1-2 (usually this action is performed upon purchase).
- Cut the 1.5-meter tube into two parts and insert into it the assembled nipple (Figure 1-3). If the tubes do not enter to the very end, then you will not have to rely on a good pump.
- Unscrew the two mounting screws on the case (Figure 1-0) and place the assembled tube and teat in the side hole (Figure 1-5). Pull the “c” part so that it falls into the “d” clamp (the connection should be as tight as possible), then straighten the inlet and outlet tubes (labeled “IN” and “OUT”) and close the case. Of course, all tubes and wires must pass freely, without clamping.

Incubation
Connecting the console and the pump to the incubator, it remains only to include it in the power supply network, and you can start working. From the first start, the device will work with the factory settings, that is, to maintain the temperature at +37.5 ° C, and humidity - about 45%.
If these values do not suit you (they can differ depending on the type of bird chosen), then you need to change them manually using the buttons below the displays. Once the power is connected, the displays will blink and the pump will start for a few seconds.
Important! When first turned on, there may be an unpleasant smell, which is considered normal.
At the same time, the incubator version will appear on the screen, and then a beep will sound for 15 seconds. At the same time, you will see the current temperature and humidity displayed on the screen, which will flash.  If after some time, for some reason, the power supply to the incubator is broken, then after its reconnection the first indicator will light up. After the first activation, the device will reach the factory settings in about an hour from the start, since artificial intelligence needs time to determine the optimal values of the environment.
It is worth paying attention to some other features when working with R-Com King Suro20:
- if it is necessary to stop turning the eggs 3 days before the chicks appear, it is enough to remove the incubator from the turntable console and put it on the table, removing the egg dividers;
- If several species of birds are displayed in the device, then 3-4 days before their expected appearance, you can move the eggs to a brooder, the role of which another incubator will perfectly suit;
- when breeding parrots or other non-breeding birds, it is desirable to additionally turn the eggs manually, performing this procedure 1-2 times a day;
- On R-Com King Suro20, there are no special on or off buttons, so after the end of the incubation process, you just need to unplug the power cord.
Hatching chicks
The first chicks may appear a few days before the expected end of incubation. They are necessarily deposited in another warm place and begin to care, while the others are still waiting for their turn inside the device.
You will probably be interested in reading about how to properly grow chickens after an incubator.
If the dates are suitable, but you have not noticed any activity and not a single egg has been hatched, you can enlighten the clutch by holding each testicle in front of the lamp. This will help ensure that the embryos are in the correct position: the necks must be pulled out towards the narrow part of the egg.
The closer the hatching period, the more activity should be observed under the shell. A measured and loud enough squeak indicates the imminent appearance of the chick, especially if on the surface of the shell shown nakleyv.  At the end of the incubation process (all eggs can be removed in 1-2 days after the set date), it remains only to clean the incubator, and then you can proceed to a new stage. In the new setting is not necessary, just connect the power cable.
Device price
R-Com King Suro20 can not be called a very expensive incubator. In Ukraine, the price of the device ranges from 10,000 UAH., While in Russia it is necessary to spend more than 15,000 rubles.
It does not make sense to look for this incubator in Europe or America, as together with the transfer it will cost about the same amount, but on some sites you can see its price in dollars (for example, at suro.com.ua they ask for $ 260) .
findings
Based on user feedback, R-Com King Suro20 is a great option for a home incubator that completely copes with the tasks assigned to it, while requiring minimal human intervention.  In comparison with the popular "Ideal hen," all processes are more automated, and manual turning of eggs is practically not required.
Therefore, we can say that it is a good and multifunctional budget option, which is recommended for use both in a small farm and for regular withdrawal of various types of poultry.
Reviews from the network