Drains are installed for removal from the roof of the water that fell in the form of precipitation. This system helps to protect the roof, walls and foundations from excess moisture. This design can be installed by yourself, and if you have the necessary skills, you can make and assemble it yourself. The article will look at what types of drainage systems exist and how they can be done independently.
What materials for gutters use
For the manufacture of gutters, you can use a variety of materials:
- plastic is the cheapest option;
- galvanized iron is also an inexpensive option. It can be painted or have a polymeric coating (like other metal gutters), which prolongs its service life and increases its cost;
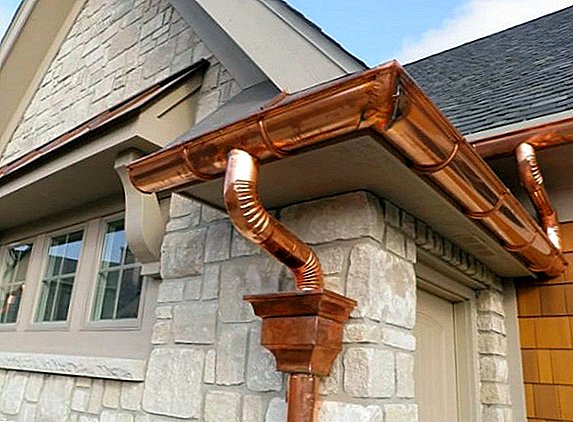
- copper - long serves, but also expensive;
- aluminum is lightweight and can be painted;
- concrete - mainly used for the ground part, diverting water from the walls and foundation;
- ceramics - is the most durable;
- wood - making wooden gutters requires carpentry skills and time.

Did you know? The most resistant to water are coniferous tree species. An excellent choice would be larch, which in the water does not rot, but stone. Everything else, this strong tree with time becomes even stronger. Larch because of its resin does not damage insects.
The main elements of the system
The drainage system of any house consists of the following components:
- Gutter Mounted horizontally with a slight slope on the outer sides of the roof slope. If necessary, it can have swivel corner elements. It is into it that water flows from the roof.
- Trumpet. Mounted vertically. This element enters the water from the gutters through the diagonal knee and the drain funnel and is displayed down.
- Drain knee. Fastened to the bottom of the pipe and drains water from the walls and foundation of the house;
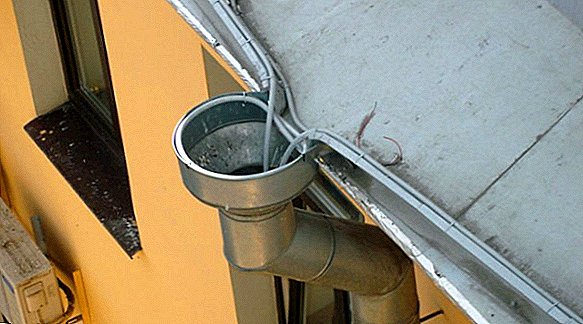
- Drain funnel Water from a gutter enters it and goes to the pipe. Usually equipped with a special mesh that protects from falling into the pipe debris.
- Fastening elements. With the help of their gutters and pipes are attached to the building. These are brackets (for chute) and clamps (for pipes).
- Other auxiliary elements. Various sealants and fasteners, plugs, tees, contours.
Learn how to make a greenhouse with an opening roof, make a roof for a bath, self-cover the roof with metal tile, ondulin, and also make a mansard roof and insulate it.
Types of drainage systems
Drainage system can be internal or external. The system of internal drainage is used in multi-storey buildings and is laid at the design stage of the building. With their own hands set the external structure.
Manufacturing material
Mainly used two types of drainage:
- From plastic. Nowadays, plastic products are becoming more and more popular. They are inexpensive, weigh little and are easy to assemble. With their help, you can implement a very different design. Plastic drainage systems are recommended to be installed on houses and various buildings on one floor, as well as in the presence of residential attic.
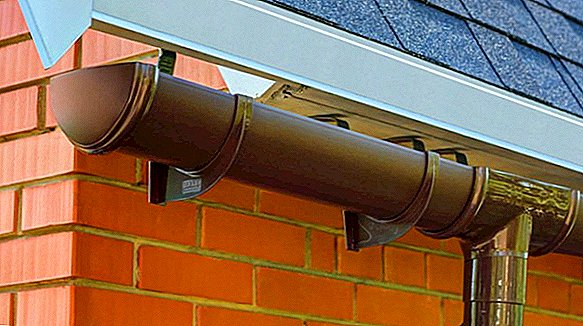
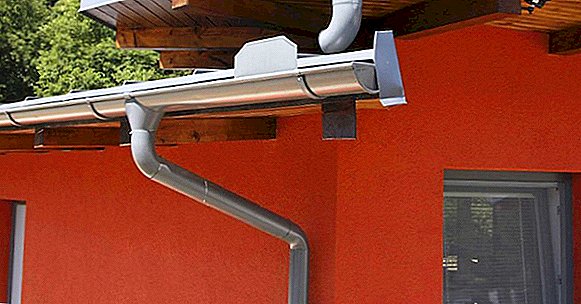
- Made of metal. The most familiar to us systems of drains, suitable for buildings of different heights and any climate. Gutters made of galvanized iron, copper and metal with a polymer coating and protective painting of various colors are now produced. The coated metal can be scratched and rust in the damaged area.


Plastic drainage elements connect:
- cold welding (glue);
- snaps and clips;
- rubber seals.
Metal drainage connect with each other:
- clamps;
- seals.
According to the method of manufacture
There are only two ways to manufacture drainage: homemade and industrial.
Familiarize yourself with the installation of sewage in a private house.
Homemade drainage system is made from such materials:
- galvanized steel sheets. The most commonly used material;
- PVC sewer pipes. Often, after construction or repair, a considerable amount of plastic pipes remains - they can be easily adapted to an improvised drainage system;
- plastic bottles. With a very tight budget, you can use such a waste material.

Industrial products are different from handicraft features:
- variety of forms. They may have a different section, but usually they are semicircular or rectangular;
- standard sizes;
- may have a protective coating that is impossible to make and apply at home;
- more neat look.
Did you know? In the north of the US state of California at Monticello Dam's dam is the world's largest gutter, forming a funnel 21.6 m in diameter, which narrows down and has a depth of 21 m. It can pass through itself 1370 cubic meters of water and is used to discharge its surplus.
Advantages and disadvantages
Plastic and metal drainage have their advantages and disadvantages to each other.
Plastics
Advantages of plastic:
- ease. Low weight plastic does not load buildings and building structures. Installation of lightweight elements is less labor intensive;
- easy installation Such lightweight structures can be fastened and joined together in simplified ways, even with glue. Most often, such kits include all the necessary fastening and auxiliary elements, and do not have to buy anything;
- plastic drains have a lower price, with the exception of galvanized iron. However, they are more durable than conventional galvanization;
- the average lifetime is about 25 years;
- they do not make noise, are dielectrics and do not heat up strongly in the sun;
- do not rust, do not rot, are not affected by chemical or biological factors;
- may be different colors.

The disadvantages of such systems are:
- lower strength. Plastic is less durable than metal, and can not bear a large load. In regions with snowy winters in the presence of plastic drainage it is recommended to install snow clamps on the roof;
- smaller interval of permissible temperature condition - from -50 to + 70 ° С. In a climate with a large difference in annual temperatures can quickly fail;
- some brands have color instability;
- not the highest life.
Metallic
Advantages of metal products:
- more durable and reliable;
- long service life (except for simple galvanization);
- tolerates a wide range of temperatures - from -70 to + 130 ° С;
- can be painted in any color with special protective paint.
The disadvantages of the metal system are:
- heavier weight;
- higher cost;
- subject to corrosion. The polymer coating protects the metal from rust, but is easily damaged;
- create a lot of noise;
- get very hot in the sun, conduct electricity.

Calculation and planning
To install the drainage system, it is important to correctly calculate and plan the purchase of the necessary materials to avoid unnecessary expenses or the need to buy more. First of all, it is necessary to calculate the area of the roof and determine the size of the elements of the system:
- with a roof area of up to 50 square meters. meters should be purchased gutters 10 cm wide and drain pipes with a diameter of 7.5 cm;
- if the roof area ranged from 50 to 100 square meters. meters, the width of the groove should be 12.5 cm, and pipes - 8.7 cm;
- for large roof areas, gutters with a width of 15 cm and pipes with a diameter of 10 cm are used.
Important! On the protruding parts of the roof (sheds, canopies, etc.) water outflows are installed in separate lines.
To calculate the required amount of materials, consider the following:
- The number of gutter pieces depends on the sum of the lengths of the lower edges of all roof slopes, to which the spillway is mounted. Since the plastic chute has a length of 3 or 4 m, and of galvanized steel - 2 m, this amount is divided respectively into 2, 3, 4. The result of the calculation is rounded up to create a stock that is still useful. It is necessary to take into account the distance for the drain pipe, separated from the wall surface (up to 8 cm).
- The number of pipes is calculated based on the length from ground level to the roof and the number of installed effluents. One drain is mounted on 80-100 square meters. meters of the roof, and for the dual-pitch roof - from each slope one by one. If the roof slope is longer than 20 meters, the plums are mounted on two sides of the slope. Thus, the number of drains is multiplied by the height of the house and divided by the length of the pipe.
- The number of pieces of funnels and knees equals the number of drains. If there are protruding elements on the wall where the drain pipe passes, then additional bends of pipes are used for rounding them.
Read also about how to make a gable and chetyrehskatnuyu roof.
- Chute connectors are needed when installing a closed spillway system, and their number depends on the number of corners of the roof. Plugs gutters are needed when installing an open system weir, and their number is determined by the number of open ends of the gutters.
- The number of gutter connectors depends on the number of joints between them. On average, for every 6 m length of the channel, there is one joint.
- The number of brackets depends on the length along the edge of the slopes. They are mounted with a pitch of 0.5–0.6 m and 15 cm indented from the edges. The number of these mounts is calculated by the formula — 30 cm of indents from the edges are taken from the ramp’s length in cm and divided by the stride length (50 cm). It should also be noted that for mounting brackets you need to take 3 screws for 1 piece.
- Dvukhmuftovy taps are determined at the rate of 2 pieces per 1 vertical drain. Couplings for pipe connections are determined based on the need of one coupling for one joint of two pipes. Their number is considered the same as the number of gutters for couplings: the number of single-flush outlets is equal to the number of drains.
 Double muffle tap
 - Pipe clamps are mounted at a distance of no more than 1.5-2 m. Screws and dowels are taken from the calculation of 1 piece for each fastener. Their length should be enough to mount the drainage part to the wall through a layer of insulation.
 Double muffle tap
 The easiest way to calculate the amount of materials for a single-pitch roof. For example, for one 10-meter slope (with a roof size of 10 m by 6 m and a building height of 5 m) you will need to purchase:
- 4 three-meter grooves 12.5 cm wide;
- 3 two-meter pipes with a diameter of 8.7 cm;
- one cap for the upper end of the gutter;
- one drain funnel;
- one drain knee;
- 3 connections for gutters;
- 2 pipe connectors;
- 3 pipe clamps;
- the number of brackets - (1000-30) / 60 = 16 pcs.
Did you know? In Japan, chains are used to divert water from the roofs of single-story buildings. This drainage in combination with decorative bowls looks very interesting. The chain is well stretched and placed from the wall no closer than half a meter.For a double-slope roof with the same size of both slopes (10 m by 6 m), the amount of materials doubles, as weirs are mounted on each edge of the slope.
 For a sloped roof, the length of the grooves is equal to the perimeter of the roof (plus the stock), and the length of the drain pipes is equal to four heights of the building being constructed. For a roof with four slopes of the same size, they purchase the following number of elements:
- 12 three-meter gutters;
- 12 two-meter pipes;
- 4 plugs for gutters;
- 4 funnels;
- 4 drain knees;
- 8 chute connectors;
- 8 pipe connectors;
- 12 pipe clamps;
- brackets - 2 * (1000-30) / 60 + 2 * (600-30) / 60 = 42 pcs.
Installation of drainpipes
Installation of the drainage system is done before roofing work - then the fastening elements can be easily attached to the rafters or the roof sheathing. They can also be fixed to a special mounting plate. When attaching to the batten, longer hooks are used, and if the brackets are mounted on the board, then shorter-sized fasteners should be selected.
We advise you to read about how to install the instantaneous water heater, septic tank, as well as how to make water from the well.
From plastic
Many elements and components of this light construction can be assembled at the bottom and then only lifted up and properly fixed. For cutting plastic items using a hacksaw or saw for metal. The edges are aligned with a hacksaw or sandpaper. Fastening elements (brackets) are installed at the same time ahead. 
When installing plastic drainage, the following work is done:
- first mark the place for mounting brackets, while retreating from the angle of the roof 15 cm. The distance between them - no more than 0.5 meters. Height difference should not be more than 5 mm per meter. It should also take into account the slight slope of the gutter in the direction of the drain pipe. The optimal slope is 3-5 mm per 1 meter;
- first fasten the extreme elements - the uppermost bracket and the lowest;
- Plastic gutters are mounted on brackets and connected to each other. At the joints must be completely tight;
- cut openings for discharge;
- install drain funnels;
- all joints are sealed;
- under the drain funnel attach the clamps for mounting pipes at a distance of 2 meters from each other. To mark the attachment points use a plumb;
- first, an inclined knee is fastened under the drain funnel;
- pipes are fastened under the inclined knee, connecting them to each other with the help of clutches and fixing clamps;
- at the bottom of the drain pipe set the outlet elbow.
It may also be useful for you to know how to build a cellar in the garage, how to get rid of groundwater in the basement, and how to make lighting for a country house.
Metal system
When installing a metal drainage system, the following steps are performed:
- the brackets are fixed at a distance of no more than 0.6 meters from each other, taking into account a slight slope (2-5 mm per 1 m). In the place of the sink for the funnel set a couple of brackets;
- installation of gutters. They are inserted into the grooves of the brackets and clamped with a lock. The metal gutters are cut to the desired length by hand-sawing the metal and then the place is cut with a small file. Two troughs overlap by 5 cm, with the top of it should be directed towards the slope to avoid leakage;
- on the edges of the grooves that do not lead to the sinks, install the plugs and seal them with rubber gaskets or a sealant;
- install drain funnels and protective nets;
- a drain elbow is attached to the drain funnels;
- mark the place of fastening for pipes, attaching them first to the drain knee;
- installation of clamps in the intended places on the wall;
- installation of pipes. The pipes are connected to each other up to the required length and fixed with clamps, fixing the removable part of the clamp with bolts and screws;
- Attach to the lower ends of the pipes drain elbows, leading the water from the roof away from the walls and the foundation.
 It remains only to organize the drainage system and heating drainage. How tight the system is, you can check it like this: close the plums and pour water into the structure - there should be no leakage. Then the plums are opened, and the water is poured through the funnel through the pipes. At the same time tightness and throughput of vertical elements is checked.
How to make yourself from improvised means
Drain can be made independently of various available tools. This saves a lot of money. When installing the drainage system with their own hands, a material such as galvanized steel is very popular. It will serve for about 10 years - it is quite economical, as well as affordable material. Let us consider this option in more detail.
To work on the creation of drainage from galvanized steel will need the following tools and materials:
- metal shears;
- hammer;
- marker for marking;
- sheets of galvanized steel with a thickness of about 0.5 mm;
- pliers.
 We outline a straight line on such a blank: on one side it will be 0.5 cm, on the other - 1 cm. Then you need to bend the sheet with pliers as follows: the side that is smaller at a small angle and the other at an angle of 90 °. After that, the edge that above, we wrap and connect the edges of the workpiece. And the smaller side should enter the big one.
  With the help of a hammer, you need to bend a little pipe in order to further connect it with another pipe. The next step is to make a chute. First you need to make a blank of a pipe or tree, which is placed on a sheet and with the help of a mallet cut out the desired shape.
  Before assembly, all metal parts can be coated with a special waterproof paint, which will well protect the structure from metal corrosion, and it will last longer. The process of installing such a drain occurs in the following sequence:
- mark the starting point for installation, located at the maximum height;
- fasten the gutter bracket;
- install the funnel, which is located at the lowest point between the brackets;
- combine the funnel with a pipe;
- fix the drain pipe using clamps;
- From the bottom we attach and fix the drain to the pipe;
- we make installation of system for heating of a drain.
Video: do-it-yourself roof drains
Heated water in winter
Heating the drain in winter is needed to prevent water in the pipes and gutters from freezing, which can contribute to damage to the drainage system - such a design can not withstand the weight of ice formations. In addition, heating the drain eliminates the formation of ice jams, icicles at the beginning of the gutters. Typically, such a heating system includes a cable for heating and a control unit.
The type of cable installation work and its capacity depend on the following factors:
- type of roof. The roof is cold or warm surface. The latter indicates the loss of heat from the house and poor insulation;
- type of drain. Can be modern metal or plastic, old metal. So, the old gutters from thick galvanized steel need a more powerful drainage heating system, but for modern drainage systems made of plastic, you can pick up a cable of lower power.
On sale are two main types of heating cables for drains:
- Resistive cable. It consists of ordinary cable and insulation. This cable has a constant heating temperature and power. The main advantage is its relatively low price.
- Self-regulating cable. It consists of a self-regulating element that responds to fluctuations in outdoor air temperature, insulation, braid, and the outer shell. Such a cable in a hard frost works with maximum efficiency, and when warming, the heating power decreases - this saves energy. The heating cable is installed so as to heat the entire drain inside. On the roof, it should be located on the very edge, since a small indent is enough for icicles and icing.


Well proven systems that contain temperature controllers and temperature sensors. Thanks to the settings, they turn off heating during severe frosts and maintain a flexible temperature regime, which depends on the external environment. For the organization of proper heating, the cable is allowed from the horizontal chute to the outlet of the drain pipe. If there are several drains, the whole system is divided into separate sections.
Important! Professionals recommend installing a combined heating system for gutters and roofs for the best price-quality ratio. Thus, resistive cables are used in the roofing part, and the gutters and gutters themselves are heated with a self-regulating cable.For resistive-type cable, the power is 18–22 W / m, and for self-regulating, 15–30 W / m.
Video: heating gutters
Care and maintenance
The presence of the drainage system requires regular testing of its technical condition. Periodic cleaning of the system makes it possible to detect damage and malfunctions in the drain. Inspection of drainage systems should be carried out at least once a year. It is usually carried out in the spring - this time successfully in order to clean the weir from the leaves and debris.
To clean the drain start with gutters. For this purpose, you need to stock up on a ladder, and if the building is very high, then you need special scaffolding used in construction. Cleaning should be done with a soft brush, and then wash with water. Sharp objects for cleaning should not be used in order not to spoil the protective coating. Then you can begin to check the patency of drain pipes. Flush it with water under pressure (for example, from a hose).  If the construction contains grids and filters that retain dirt, then they are dismantled and then cleaned. After completion of the process of cleaning the drain start its maintenance. With the help of a special lacquer coating paint over scratches and other minor mechanical damage. Small holes and leaks in the pipes are eliminated with the help of sealants.
Gutter system can be made and installed by hand. Of course, it is easier to use the prefabricated elements of this design, made in the factory, but independent production will help save money. At the same time, you should carefully read the instructions and follow them; then a properly assembled and installed system will work without fail for many years.