Any gardener sooner or later faces a transplant of their pets to a new place. It is always stressful for plants, and a fragile and whimsical orchid requires heightened accuracy and care when replanting.
If everything is done correctly, the flower will feel comfortable in the new place and will not experience the slightest stress. After transplantation, the plant needs time to adapt. Therefore, it is necessary to provide him with the most comfortable conditions.
What you need to know about the plant?
It is important to note that such a plant as an orchid is an epiphyte - a plant growing in symbiosis with trees.
Rooting process epiphytes not required - their roots grow into the bark of trees, while receiving moisture during the rain and during the dew.
Growth features
Orchid, like other epiphytes, has a tendency to grow rapidly, and as a result - the rapid depletion of the nutrient substrate. At home, this, in essence, requires only a timely complete replacement of the soil, so that the plant can continue to feed.
When to replace the soil?
It is time to transplant the plant if:
 the roots no longer fit in the pot, the "air" roots begin to appear;
- numerous yellow spots begin to appear on the leaves;
- the plant has not flowered for more than 3 months;
- insects (worms, centipedes, snails) appeared in the pot earth;
- It has been a long time since the purchase of orchids (more than a year).
 the roots no longer fit in the pot, the "air" roots begin to appear;
The best time for transplanting is the period when the plant has already faded and is at rest.
Spring is the best time to transplant., however, given the weak sensitivity of the orchid to pruning roots, this is not a critical condition. It is also possible to transplant a blooming orchid, in which case it is required to trim the flowering parts of the plant by about two centimeters.
We offer you to watch a video about when to replant an orchid:
Stages of preparation
In preparation for transplanting orchids, first of all it should be dried - This will speed up the process of restoring damaged when transplanting the roots of a plant. Drying takes about seven to eight hours, while the plant should be put on a dry cloth.
For the successful implementation of the transplant procedure, it should be remembered that a new pot for a plant must be larger in diameter than the previous one.
Tools and materials required for transplanting orchid plants:
- pruner;
- sharp knife;
- new pot;
- New tree bark (or a special soil with bark in the composition);
- drainage.
It is worth a responsible approach to the choice of bark for transplanting orchids. Spruce and pine bark is very well suited, bark from deciduous trees is also suitable.
Do not take bark from rotten trees, because there are many parasites in such a bark!
What bark is needed?
 What bark to use when filling a new pot, decide the florist. Of course, more convenient and faster to purchase material in a specialized store.
A modern range of products offers a ready-to-use soil substrate, which contains both the bark and other nutrients. However, if there is a desire to be completely confident in the quality of the bark, then it will be better to assemble it yourself.
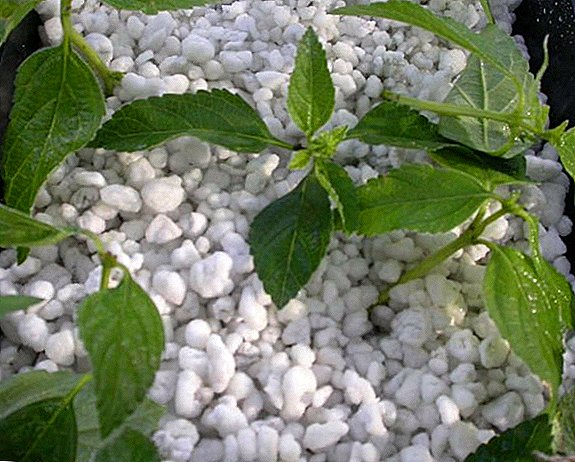
For transplanting orchids is best to use natural materials! You can only replace drainage - suitable for this are expanded clay or foam balls.
We offer you to watch a video on how to prepare your own bark for orchids:
Substrate and Drainage Selection
 Soil for transplanting can be obtained in two ways: buy it in a specialty store, or make it yourself.
In the composition of the soil must be present the bark of trees - as the main nutrient for orchids.
Also in the soil includes such a component as sphagnum moss (or peat). Drainage should be provided in the form of river stones, river sand or expanded clay / foam balls.
We offer to watch a video about which substrate is better for orchids:
Focus on lighting: what to transplant at home?
Certain requirements should be observed when choosing a potso that the result of the transplant does not affect the plant destructively.
The best pot criteria are:
- The size. A new pot should be larger than the previous one by 2-5 cm in diameter.
- Materialused for making. A pot made of plastic with holes drilled in the bottom is best suited - this will allow excess moisture to flow out after watering the orchid. In addition, it is desirable to choose a transparent pot - this will allow the root structure of the plant to receive the required amount of sunlight.
We offer you to watch a video on how to choose an orchid pot:
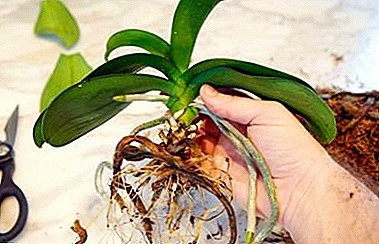
Step-by-step process description
 Carefully remove the plant from the old pot.
- Release the roots from the ground (shake off, rinse with water at room temperature).
- Remove possible parasites from the roots. To do this, soak the orchid roots in water. In a few hours the pests will die. You can also treat the roots with a special pest remedy.
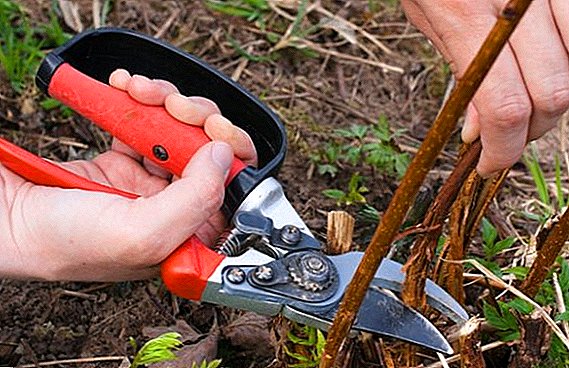
- Remove the dead and rotting roots of the plant by cutting them with shears.
- Fill a new pot with drainage by a third.
- Plant an orchid in a pot.
- Carefully fill up with new soil.
 Carefully remove the plant from the old pot.
When backfilling a new substrate, periodically lightly tap the pot on a hard surface. This is done for a more uniform distribution of the soil.
So, the orchid is transplanted. After transplantation, she needs good lighting and daily spraying. - for high humidity.
If these simple requirements are met in a timely manner, the plant will quickly get used to the new place and will delight the gaze of its owner with flowering.